Installing your own water heater might seem like a daunting task, but with the right tools, knowledge, and preparation, it can be a rewarding and cost-effective DIY project. Whether you’re replacing an old unit or installing a new one, understanding the steps involved can help ensure a smooth and successful installation. This guide will walk you through the entire process, from selecting the right water heater to completing the installation and troubleshooting common issues.
Choosing the Right Water Heater
Before diving into the installation process, it’s crucial to select the right water heater for your needs. Consider the following factors:
Type of Water Heater
There are several types of water heaters to choose from, each with its own advantages and disadvantages:
Tank Water Heaters: These are the most common type, storing a large volume of hot water for immediate use. They are available in various sizes and fuel types (electric, gas, propane).
Tankless Water Heaters: Also known as on-demand water heaters, these units heat water only when needed, offering energy savings and a continuous supply of hot water.
Heat Pump Water Heaters: These units use electricity to move heat from the air or ground to heat water, making them highly energy-efficient.
Solar Water Heaters: These systems use solar panels to collect and convert sunlight into heat for water, providing an eco-friendly option.
Fuel Type
Consider the fuel type available in your home:
Electric: Easy to install and maintain, but generally more expensive to operate.
Natural Gas/Propane: Often cheaper to operate than electric models, but require proper ventilation and gas lines.
Solar: Eco-friendly and can significantly reduce energy bills, but require a higher initial investment and depend on sunlight availability.
Size and Capacity
Determine the appropriate size and capacity based on your household’s hot water needs. Tank water heaters are rated by their storage capacity (gallons), while tankless models are rated by their flow rate (gallons per minute, GPM).
For a family of 1-2 people: A 30-40 gallon tank or a tankless unit with a flow rate of 3-4 GPM.
For a family of 3-4 people: A 40-50 gallon tank or a tankless unit with a flow rate of 5-7 GPM.
For a family of 5 or more people: A 50-80 gallon tank or a tankless unit with a flow rate of 8+ GPM.
Tools and Materials Needed
Gather the necessary tools and materials before you begin the installation:
Tools:
Adjustable wrench
Pipe wrench
Screwdrivers (Phillips and flathead)
Pipe cutter
Tubing bender (for gas lines)
Level
Plumber’s tape (Teflon tape)
Pipe sealant
Drill and bits
Tape measure
Materials:
New water heater
Flexible water supply lines
Gas line connectors (if applicable)
Venting pipe and fittings (for gas water heaters)
Pressure relief valve
Drain pan
Electrical wiring (if applicable)
Insulation (optional)
Preparing for Installation
Proper preparation is key to a successful installation. Follow these steps to get ready:
Turn Off Utilities
Before you start, turn off the utilities to ensure safety:
Electric Water Heater: Turn off the power at the circuit breaker.
Gas Water Heater: Turn off the gas supply valve and the control knob on the water heater.
Water Supply: Turn off the main water supply valve.
Drain the Old Water Heater
If you’re replacing an existing water heater, you’ll need to drain it first:
Attach a garden hose to the drain valve at the bottom of the tank.
Place the other end of the hose in a floor drain or outside.
Open the drain valve and let the water flow out.
Open a hot water faucet in your home to help the tank drain faster.
Disconnect the Old Water Heater
Once the tank is drained, disconnect the old water heater:
Water Supply Lines: Use a pipe wrench to disconnect the cold and hot water supply lines.
Gas Line (for gas water heaters): Use a pipe wrench to disconnect the gas line. Apply pipe sealant to the threads of the gas line.
Electrical Connections (for electric water heaters): Disconnect the electrical wiring from the junction box on top of the water heater.
Installing the New Water Heater
With the old unit removed, you can now install the new water heater. Follow these steps:
Position the New Water Heater
Place the new water heater in the desired location. Ensure it is level and has adequate clearance on all sides. If you’re installing a gas water heater, make sure it is properly ventilated.
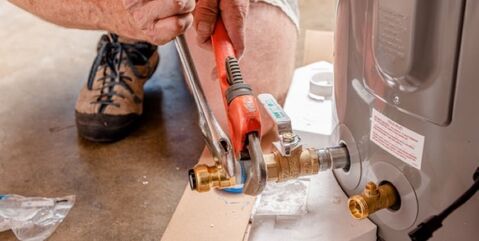
Connect the Water Supply Lines
Apply plumber’s tape to the threads of the cold and hot water inlet and outlet pipes.
Connect the flexible water supply lines to the cold water inlet and hot water outlet using a pipe wrench. Ensure the connections are tight to prevent leaks.
Install the Pressure Relief Valve
The pressure relief valve is a safety device that releases pressure if it becomes too high. Install it according to the manufacturer’s instructions:
Wrap the threads of the valve with plumber’s tape.
Screw the valve into the designated opening on the water heater and tighten with a wrench.
Attach a discharge pipe to the valve, directing it towards the floor or a drain.
Connect the Gas Line (for Gas Water Heaters)
If you’re installing a gas water heater, connect the gas line:
Apply pipe sealant to the threads of the gas line connectors.
Use a pipe wrench to connect the gas line to the control valve on the water heater.
Ensure all connections are tight to prevent gas leaks.
Connect the Electrical Wiring (for Electric Water Heaters)
If you’re installing an electric water heater, connect the electrical wiring:
Remove the junction box cover on top of the water heater.
Connect the wires according to the manufacturer’s instructions, matching the colors (black to black, white to white, green or bare to ground).
Secure the connections with wire nuts and replace the junction box cover.
Install the Venting System (for Gas Water Heaters)
Proper venting is crucial for the safe operation of gas water heaters. Follow these steps:
Assemble the vent pipe and fittings according to the manufacturer’s instructions.
Connect the vent pipe to the draft hood on top of the water heater.
Ensure the vent pipe is properly secured and slopes upwards to the chimney or vent outlet.
Filling and Testing the Water Heater
Once the new water heater is installed, it’s time to fill and test it:
Fill the Tank
Close the drain valve and remove the garden hose.
Open the main water supply valve.
Open a hot water faucet in your home to allow air to escape as the tank fills.
Once water starts flowing steadily from the faucet, close it.
Check for Leaks
Inspect all connections for leaks. Tighten any fittings as needed. If you notice any persistent leaks, turn off the water supply and recheck the connections.
Turn On the Utilities
Electric Water Heater: Turn on the power at the circuit breaker.
Gas Water Heater: Turn on the gas supply valve and the control knob on the water heater. Follow the manufacturer’s instructions to light the pilot light (if applicable).
Set the Temperature
Adjust the thermostat on the water heater to the desired temperature. The recommended setting is typically around 120 degrees Fahrenheit to prevent scalding and save energy.
Troubleshooting Common Issues
Even with careful installation, you might encounter some issues. Here are some common problems and their solutions:
No Hot Water
Electric Water Heater: Check the circuit breaker and ensure it is turned on. Inspect the thermostat and heating elements for proper operation.
Gas Water Heater: Ensure the gas supply is turned on and the pilot light is lit. Check the control knob and thermostat settings.
Water Temperature Too High or Too Low
Adjust the Thermostat: Ensure the thermostat is set to the desired temperature. If the water is too hot or too cold, adjust the thermostat accordingly.
Inspect the Heating Elements: For electric water heaters, check the heating elements for proper operation. Replace any faulty elements.
Leaks Around the Base
Check the Pressure Relief Valve: Ensure the valve is properly installed and not leaking. Replace if necessary.
Inspect the Connections: Check all water supply and gas line connections for leaks. Tighten any loose fittings.
Tips for a Successful Water Heater Installation
To ensure a smooth and successful installation, keep these tips in mind:
Read the Instructions: Always read and follow the manufacturer’s instructions for your specific water heater model.
Take Your Time: Rushing through the process can lead to mistakes. Take your time to ensure each step is completed correctly.
Have a Helper: Having an extra set of hands can make the process easier, especially when positioning and securing the water heater.
Use the Right Tools: Using the correct tools for the job will make the process more efficient and reduce the risk of damaging your water heater or plumbing.
Conclusion
Installing your own water heater is a challenging yet rewarding DIY project that can save you money and give you a sense of accomplishment. By following the steps outlined in this guide, you can successfully replace your old water heater or install a new one, ensuring a reliable supply of hot water for your household. Remember to take your time, follow the manufacturer’s instructions, and seek professional help if needed. With careful preparation and attention to detail, you’ll be able to enjoy the benefits of a new water heater for years to come. Happy installing!